Friday 29 December 2017

Mixed Media Wall Hanging - Meena Herale

Hello, my dear crafty friends. A warm good evening to you all. This is DT Meena Herale from Sunshine Creations blog. Today is my first DT inspiration post for Nagashri Arts blog.

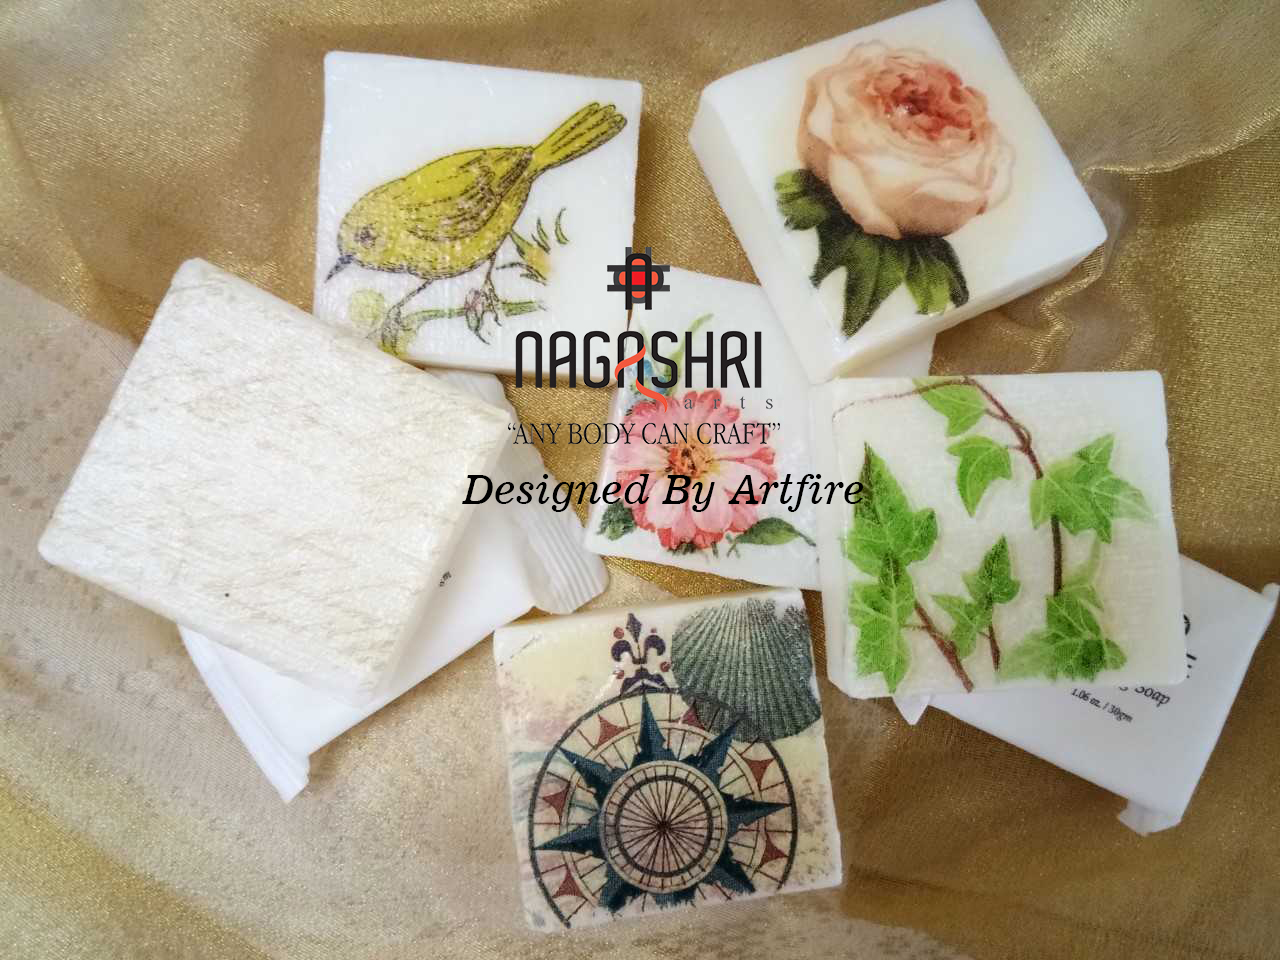
Today I am sharing a mixed media wallhanging which I  made using MDF nameplate from our Nagashri Art store. 


First I gave a coat of gesso on the MDF and I added texture using stencils and texture paste on it. Next using glossy gel I started to add flowers, stones, metal charms, MDF clock, etc on it and let few minutes to dry it. Once it dried, I gave another coat of gesso to it and dried it using heat tools. 

Next, I took few sprays, here I have used teal, light blue, green colors and started to add colors till I was OK with the outcome and dried it using heat tools. 

Next, I took the awesome Gold acrylic paint and did Dry brush technic to highlight the composition. This New acrylic paint is available in various colors at Nagashri Arts store and the result is superb. 

Here are few close-up pictures of wallhanging, 


Hope you liked it friends. 

All the materials used in this project are available at our Nagashri Art store. 


Regards 
Meena Herale 


Happy Crafting and Happy Weekend 

Tuesday 26 December 2017

Decoupage on Soap - Maansi Vaswani

Good morning everyone, 

This is Maansi here again with a project on decoupage.  By now you would have guessed that I am completely obsessed with this art form.  And rightly so,  because this is one craft form which is so versatile.  

One day while opening up a bar of soap, I wondered about whether a humble soap can be decoupaged.  It's white and has a smooth surface and though the surface is small, small projects can still be done.  A quick search on the web and some books made me realise that it is possible to do so.  

The next major question was would the soap be usable. No point in decoupaging a soap which cannot be used.  So as an experiment I decided to do one soap and use it to see the results. And I was amazed.  Not only was the soap usable but it also increased the life of the soap.  And the image remains till the soap lasts.  

And since then, I have be decorating all my soaps much to the amusement of my hubby.  

Here are some pictures of the soaps that I have recently done.  


Now coming to the procedure of doing decoupage on soaps.  

1. Take a bar of soap.  Ensure its smooth and does not have a logo or image engraved.  

2. Select image to fit the surface.  Try using tissues with a white background. The image needs to ripped and not cut and we will be using only the top layer of the napkin

3. Add a thin layer of mod podge on the surface of the soap.  While the glue is still wet gently put the tissue on the soap. Note that you are gentle yet firm while putting the tissue.  Do not put too much pressure as you could damage the surface.  Also note your brush needs to be completely dry in this process.  

4. Wait for the glue to dry completely.  Add another 3 layers of glue on top of the tissue (drying between each layer) 

And your decoupage soap is ready to use. 


Supplies used 
Soap
Decoupage tissues 
Modpodge

Thursday 21 December 2017

A Gatefold Album by Nagashri Srinivas

Namaste Everyone,

      I hope you all are geared up for your Winter Holidays. Today I am here with one of my new project made for a client who ordered this beautiful album for her beloved Brother and Sister-in-law. As the client wanted to keep it simple, sophisticated and with fewer embellishments. I have decided to pick the beautiful paper stack Cottage Blush from Bob n Betty which comes in a size of 12" by 12".


I have few tags from Enogreeting Paperback which is going well with these papers.I just love the way Enogreeting packs come out with the tags suitable for all occasions. And it added charm to my album.


   The album has more than 16 pockets and flaps to store 50 photos. The Gatefold album measures 11" by 7" with pages and pockets inside. I have used tags and added few fabric washi tapes which complimented the paper pack.I hope you have liked the project do leave some love ... :)


Here is the full image of the gatefold album.Hope you liked the album 


Supplies used here are

Time Holtz ideology Ruler 
Flowers
Black Cardstock 


Sunday 17 December 2017

Decoupage on Candles - By Maansi Vaswani


I do hope you like this alternative technique. Do give it a try and let me know if it works for you too. 

Supplies used are

Printed German Tissue
Mod podge 
Candle 
Heat tool

Wishing you a wonderful day !!
Maansi


Monday 18 September 2017

Nagashri Arts Design Team Call 2017

Namaste !!

                   We are excited to announce that Nagashri Arts is looking for the creative designers whose forte should not be limited being only creative but also who would love to be a trendsetter.  If you own a personal blog and interested in being part of our Design Team, read the entire post.


This Design Team Call is open for Indian crafters.


Requirements :


To be a part of our Design team you need to have an active blog where you have to post all your projects.

During your tenure with us, you cant be a part of any other brand as a DT / coordinator and you cannot promote any other brand on your facebook account / Instagram / blogs and website.

Two pictorial tutorials with minimum three to five projects every month and one video tutorial twice in a month with the proper content and good photography skill.

Actively promote our products including on your social media profiles as well as you have to participate in cross promotions of our products whenever it is possible.

Works on deadlines.

The tenure will be from 1st November 2017 - 31st April 2018.


Perks:- 


A Monthly DT kit to play with and create a beauty and your kit will be totally sponsored by us. You will get a chance to play with different brands.

Your bio and projects will be featured on our blogs, website, facebook, and  Instagram.

Discount on Nagashri Arts products.

A chance to work with an Indian crafting company which believes in the entrepreneurial spirit and offers the entire range of art and craft products in India.

A craft badge which you can display on social media.


How to apply:-


 Send us an email at care@nagashriarts.in

You name and the link to your blog, page and album where we can see photos of the projects made by you.

Your details like complete name and address and your photo.

Write an explanation that why you do want to be a part of our DT team.

Mention the name of the brands with whom you have worked with ( past and present both,  only if applicable).

We would love to hear from you!!


Friday 10 February 2017

Card using Vintage Leaf Die


Hi! I am here with some inspiration for you using the new Vintage Leaf dies by Nagashri Arts. I loved these dies the moment I saw them since they are so dainty and graceful.

For my first card I wanted a very soft, natural look. Here is the card I made.


I started with a kraft card base. I placed my stencil on top and used a stencil brush to apply the Dark Garnet distress ink. This is a technique that Jennifer McGuire had demonstrated in one of her videos. You can find the link here. This gives a very soft coloring that looks gorgeous. The stencil I used is the Texture Mesh by Memory Box. I die cut several branches using the Vintage Leaf Die from Kraft Color Card Stock. I colored them using the same technique and the Amazon Trails distress ink.

After my coloring was done I arranged the die cuts on my card base and glued only the centers. I turned up the leaves slightly for added dimension. I glued some pink flower shaped sequins randomly and added black seed beads to the centers. Here is a closer look at the card.


I finished the card by stamping and heat embossing the sentiment from the Just For You set by Lia Griffiths for Hero Arts on a piece of black paper. I used a pale pink EP by Wow! to match the flowers. For my second card, I wanted a more dramatic look. Here is my card.


I started with a scrap of water color paper, gold acrylic paint, stencil sponges and Camlin photo inks.


I tried the Faux Mother of Pearl technique by the super talented Loll Thompson. I love her work and have been wanting to try this technique for a long time. Here is a link to her excellent video.

I started by smooshing some gold acrylic paint on the watercolor paper with a piece of scrunched aluminum foil. After the paint was dry, I applied yellow, green and blue inks with the stencil sponges. The result was a rich, multicolored panel that I cut to size. Here is a closer look at the panel.


Sunday 1 January 2017

How to make a precision glue applicator at home


Hello Crafty friends wish you all a happy new year. With the beginning of this year we are coming up with lots of tutorials for Nagashri Arts!!


Tools are very important for any crafter and  have you ever given a  thought of making one at home ?? So lets make the most basic tool but the most important one . Today, our one of the DTs Srinivas will let us know to make a precision glue at home